We can’t talk about the future of retail and ecommerce without bringing up online marketplaces. Digital marketplaces have grown rapidly, gaining the attention of brand considering selling on Walmart Marketplace and other new spaces like the recently announced Target Marketplace.
It’s no surprise why more brands and using these spaces as research by Newegg found that in 2017, the world’s largest online retail marketplaces sold over $1.5 trillion. What’s more even more telling, these marketplaces grew over 30% within that year—double the growth of ecommerce overall.
Businesses are still learning how to compete with Amazon and get their share of the ecommerce pie. While the ecommerce giant leads the overall growth in the U.S., new online marketplaces shouldn’t be overlooked–including the Walmart Marketplace.
The challenge for brands is knowing how to sell on Walmart Marketplace to begin with and what it takes to be successful in this space. That’s why we’ve put together this step-by-step walk through guide to selling on Walmart Marketplace.
You’ll discover what makes the platform work for brands, and you’ll learn the necessary steps you should take to become a seller on the site. Specifically, we’ll cover these main topics:
Click the jump links to skip ahead
- Why Sell on Walmart Marketplace
- How Much Are Walmart’s Fees?
- How to Apply to Be a Walmart Marketplace Seller
- Complete Your Marketplace Registration
- How to Set Up Your Partner Profile
- How to Add Your Products to the Marketplace
- Preview Your Items & Place Test Orders
- How to Optimize Your Walmart Marketplace Listings
If your brand has any questions at all, our team is here to help. Contact us today to learn about our relationship with some of the top global retailers in our Open Network!
Why Sell on Walmart Marketplace?
Selling on Walmart Marketplace presents a major opportunity for brands to get its products in front of online shoppers by using the retailers name as a space to sell all sorts of products. Most consumers are familiar with the brands they can buy in store, but online marketplaces make it easy for any brand create an account and sell.
Before diving into specific tactics, here are some of the main reasons why brands should consider Walmart marketplace:
Get in Front of Millions Ready to Buy
Walmart’s website drives hundreds of millions of visitors per month. Even more impressive are Walmart’s numbers when it comes to visitor engagement. The average duration on the site is just above 4 minutes, and users view almost 5 pages per visit.
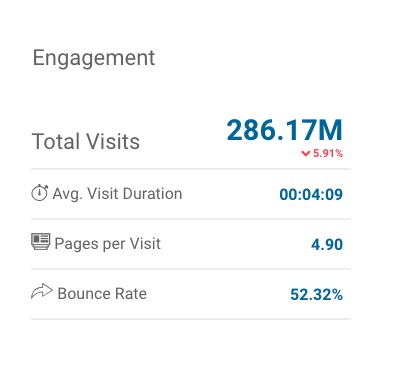
The numbers show us that people don’t just flock to Walmart in droves; they spend quite a bit of time on the site. Winning just a tiny sliver of Walmart’s visitors can do wonders for your brand by creating a massive channel that goes directly to your product.
Walmart Marketplace Is Poised for Growth
Yes, Amazon is still No. 1 as far ecommerce goes, but Walmart is certainly holding its own. According to the company’s fiscal report for 2019, Walmart’s ecommerce sales grew 43% from the previous quarter. The retailer also recently launched new features on Walmart Marketplace, including free two-day shipping on millions of products, as well as the ability to return marketplace purchases in physical retail stores.
These features are making the platform more attractive to consumers, which means your brand should be paying attention to this type of growth.
Improved Brand Recognition
Selling on Walmart Marketplace puts your brand and products in front of more people. And while not everyone who comes across your company will buy from it, having that increased presence could boost brand recognition and ultimately lead to additional traffic and sales.
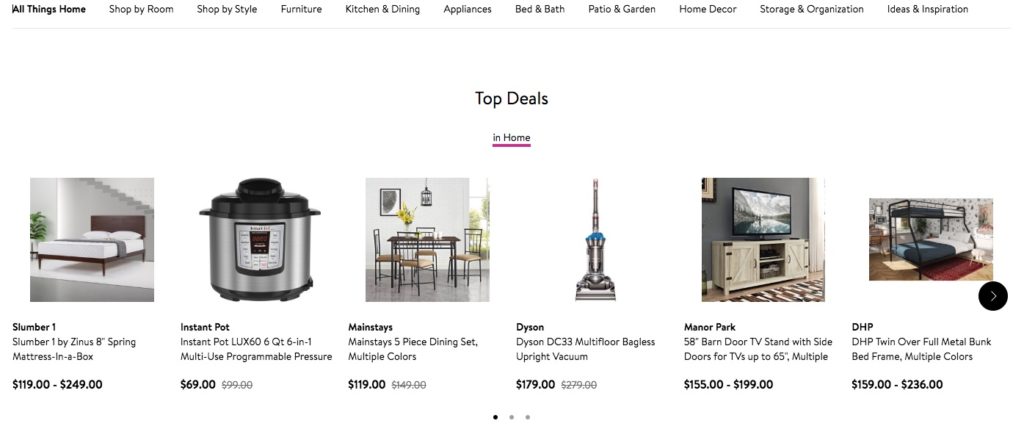
Some merchants have even reported seeing their website traffic increase after setting up a listing on Walmart Marketplace. This suggests a brand’s alignment with the retail giant increases awareness, credibility and potentially even sales.
There’s No Monthly or Setup Fees
Unlike Amazon and some other marketplaces, which charge seller subscription costs and other selling fees, Walmart simply charges a category-specific referral fee when you successfully complete a sale.
And this brings us to our next point…
How Much Are Walmart’s Fees?
Walmart’s referral fees range from 6 to 20%, depending on the product category. Below, we’ve broke down the list of the most recent referral fees for contract categories:
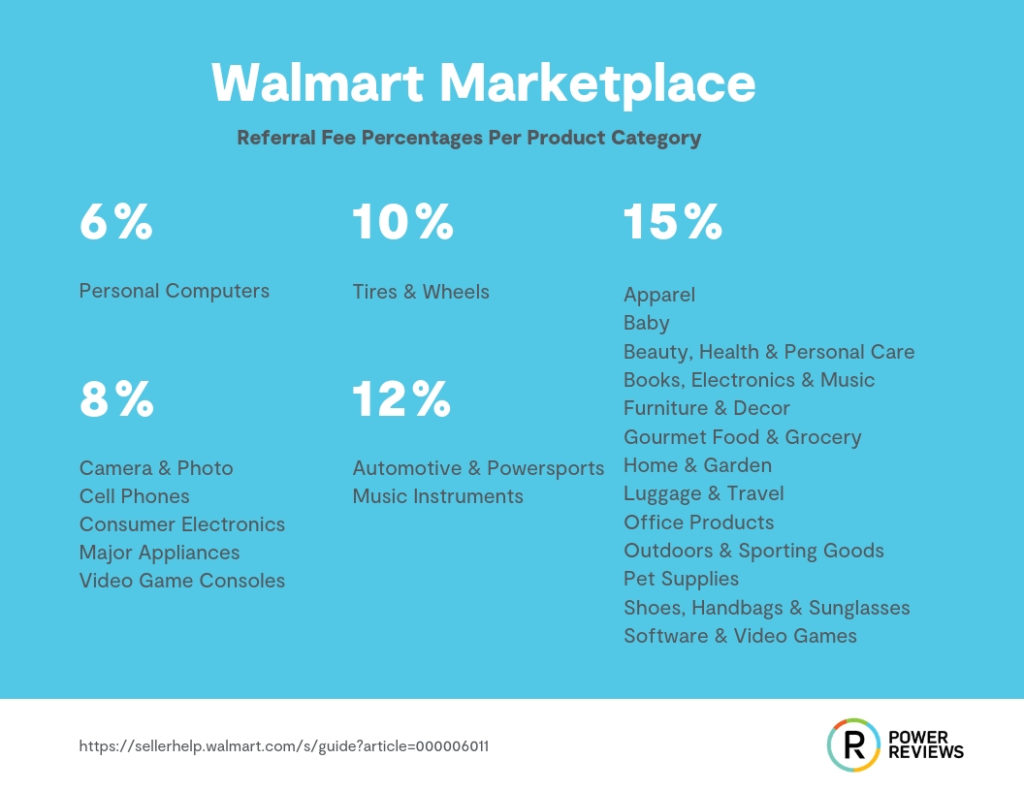
Now that you know the advantages of selling on Walmart Marketplace, let’s look at the steps you should take to become a seller on the platform.
Step 1: Apply to Be a Walmart Marketplace Seller
The first thing you need to do is to apply for a Walmart Marketplace account. You can do this by heading to marketplace.walmart.com and clicking the Apply button on the top right. Or you can access the application form directly on marketplace-apply.walmart.com.
The application form takes about 10 to 15 minutes to complete. You’ll kick it off by filling out your basic contact information.
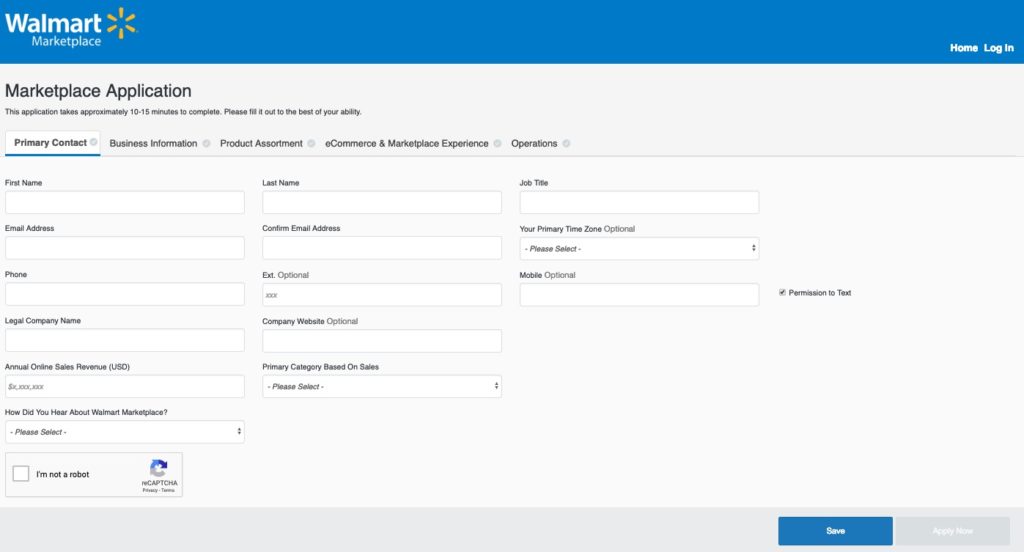
Then comes the fun part–you’ll need to supply other details about your business to legally comply with the marketplace. For example, your company needs to provide the legal company name, tax ID, annual sales revenue and other critical business information.
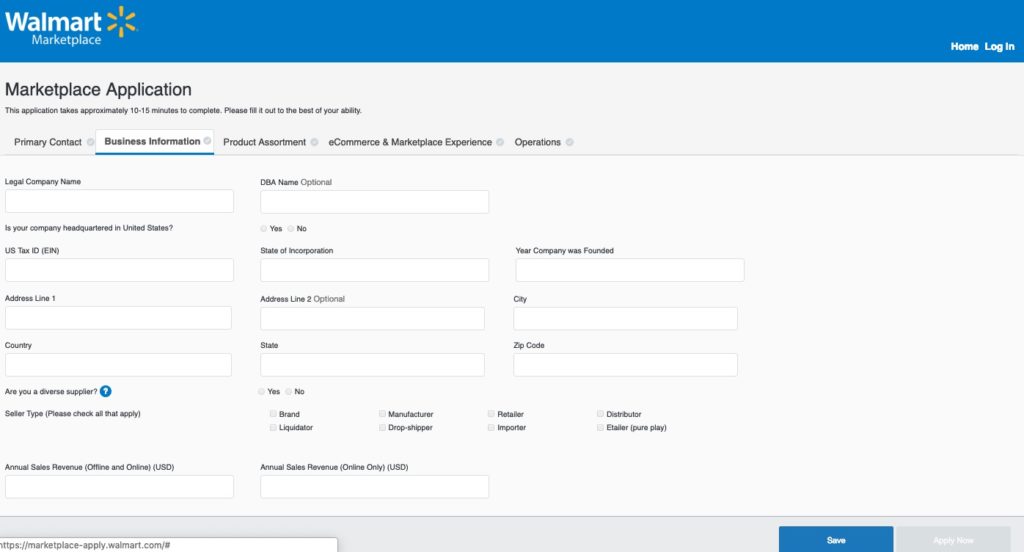
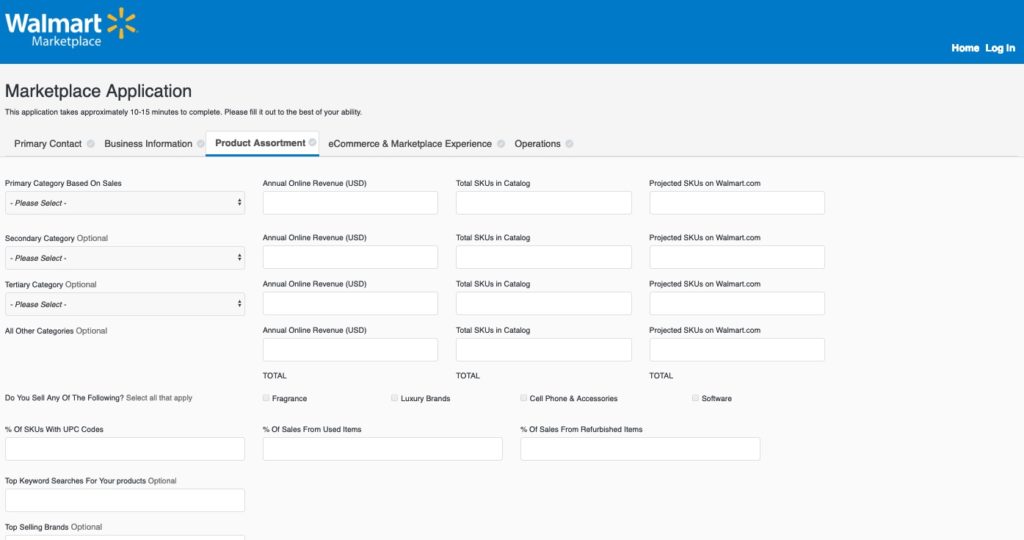
From this point, you’ll need to tell Walmart about your product assortment. This part of the form requires you to enter details about your top categories and what you actually sell.
Additionally, you’ll need to disclose your revenue and SKUs for each category.
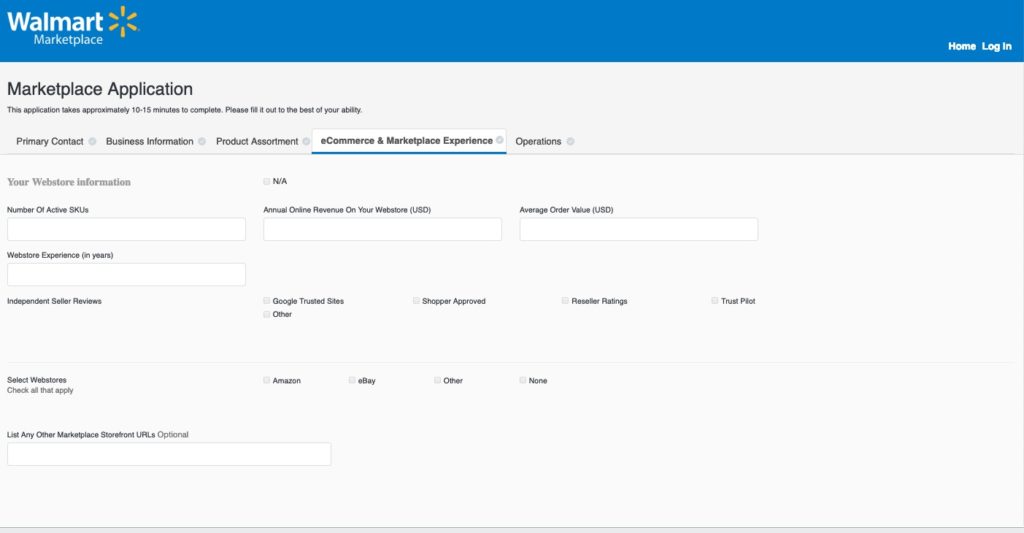
If you have a web store, be ready to provide necessary information about where and how you sell your products. For example, you’ll be asked to specify the number of active SKUs you have on sale as well as the other marketplaces on which you’re selling, such as Amazon, eBay or soon-t-be Target.
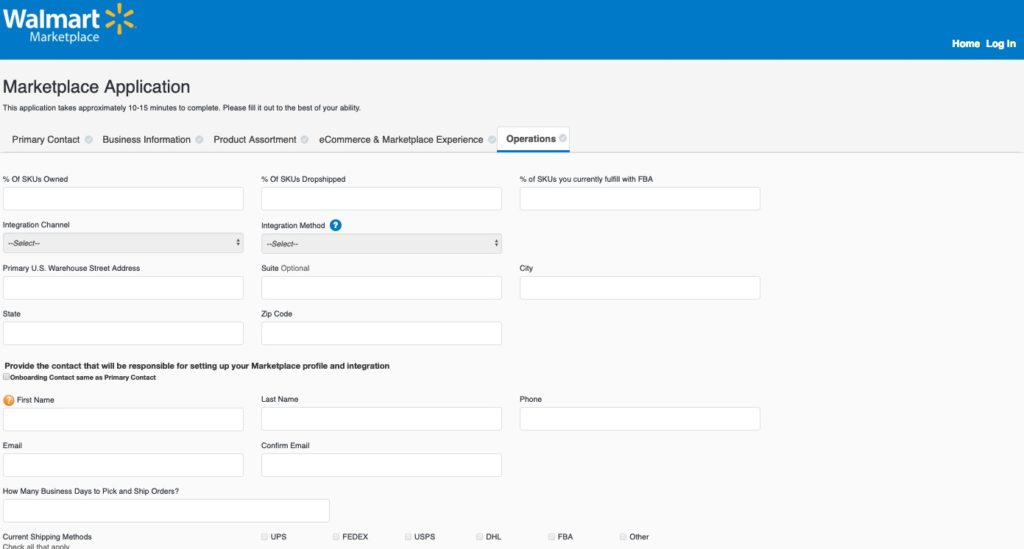
Finally, you need to answer questions about your operations. Start by entering the percentage of SKUs you own versus the SKUs you dropship and fulfill with the FBA (Fulfillment By Amazon).
Then you will be asked about your shipping methods and customer return policy.
Once you submit the form, the Walmart Marketplace team reviews your information and gets in contact with your business about the status of your application. Fingers crossed for you!
Step 2: Complete Your Registration
If your application is approved, you’ll receive an email from Walmart inviting you to complete your registration. Typically, the email will look something like this:
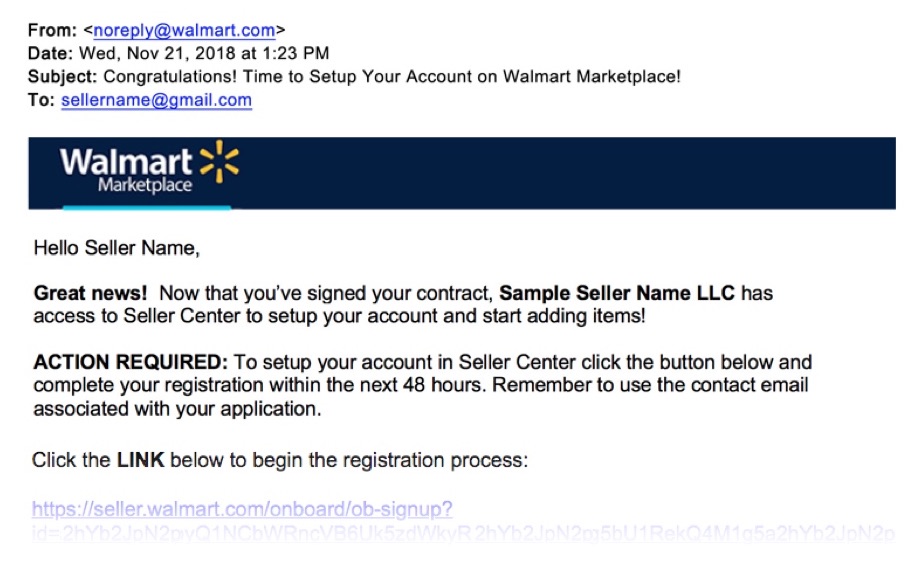
To make this part of the process easier, have the following information handy:
- Your business address
- Bank account details (for deposits from Walmart)
- Business information required for IRS form W-9
At this point, it’s time to complete your registration with the following steps:
Registration Step 1: Create Your Account
The first step in the registration process is to create your account. Walmart will automatically generate your username based on the info you entered in the initial Marketplace application.
However, you’ll need to come up with a password that you’ll use to log in to up your account, add new products and check on sales.
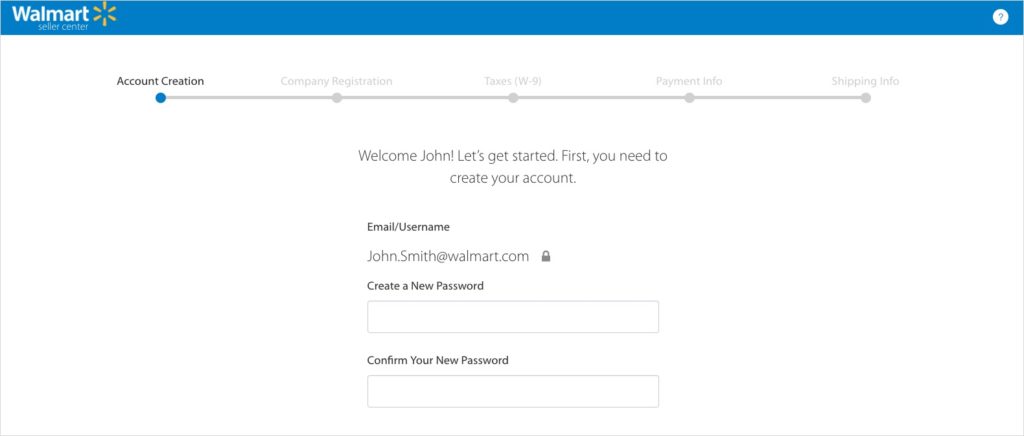
Registration Step 2: Company Registration
Here, you’ll enter your display name, which is the name people see when they shop on Walmart’s site. Additionally, you’ll have to enter your corporate address, which is only for Walmart’s internal use.
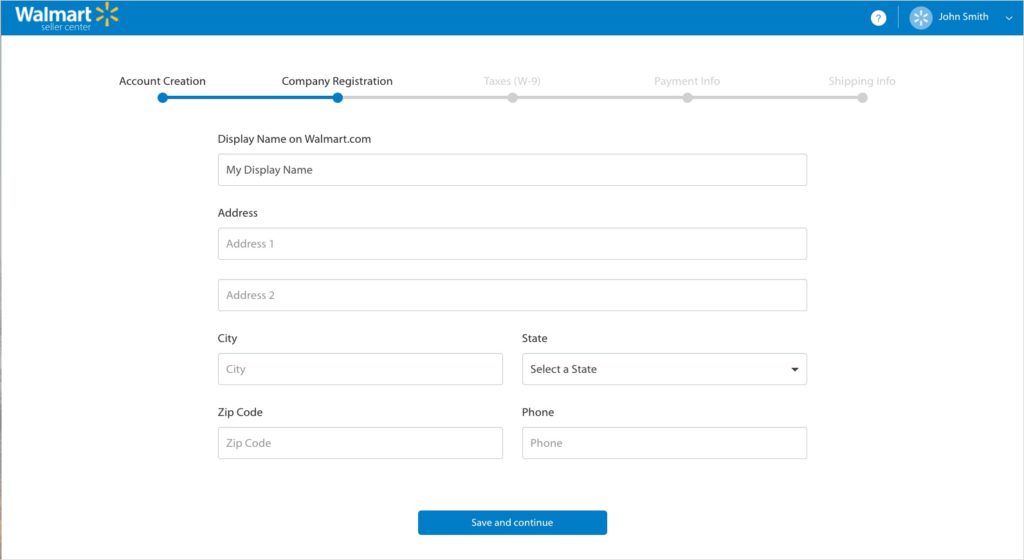
Registration Step 3: W-9 Completion
In the next step, you must provide Walmart with a Form W-9. This allows Walmart to issue your business a 1099 at the end of the year.
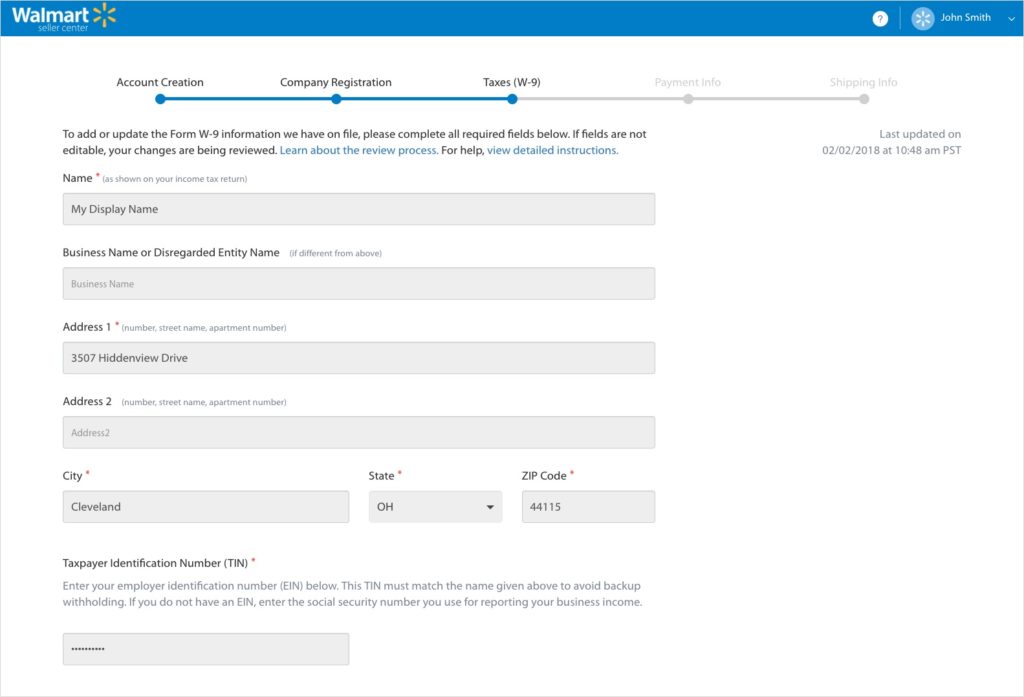
Registration Step 4: Payment Details
Next up on your registration is setting up the payment details. Walmart has teamed up with Payoneer as its payment processor for Marketplace purchases. To receive payments from Walmart, you need to register for an account on the Payoneer website.
Once that’s done, you’ll be redirected to Walmart’s Seller Center.
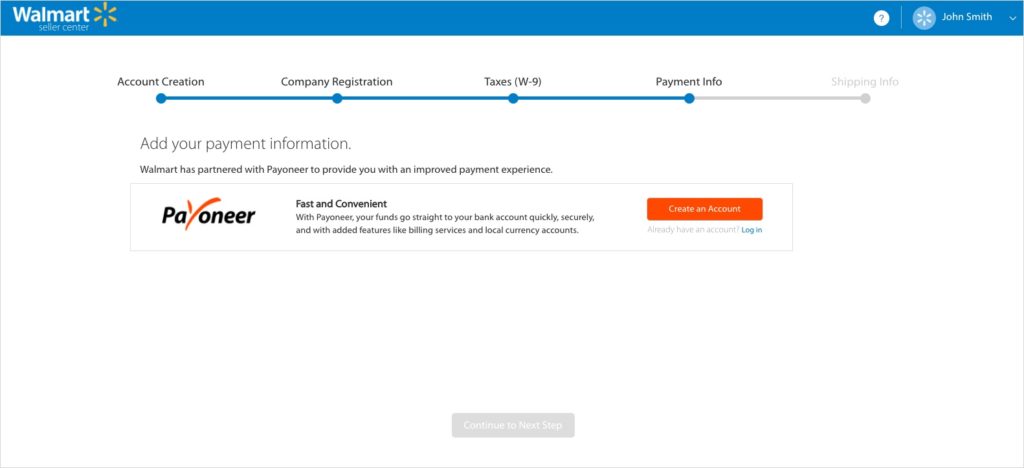
Note that your status in Walmart’s Seller Center will remain “INACTIVE” while your Payoneer registration is pending. This should take only take a few minutes, though. After your register of a Payoneer account, you’ll receive a confirmation email shortly.
Registration Step 5: Shipping Information
Once your payment confirmation is complete, you will want to set up your shipping details. This allows Walmart to charge the right fees. But to do this, you first have to decide between two pricing models:
- The Price of the Total Order: With this option, you will charge shipping based on the total price of order.
- The Number of Item(s) Weight: If you choose this option, you will charge shipping based on the weight of the products and/or how many items need to be shipped.

After setting the pricing model, specify the shipping methods and regions you support. The four default shipping methods include:
- Value
- Standard
- Next Day
- Expedited
Then you want to select the shipping regions under each method.
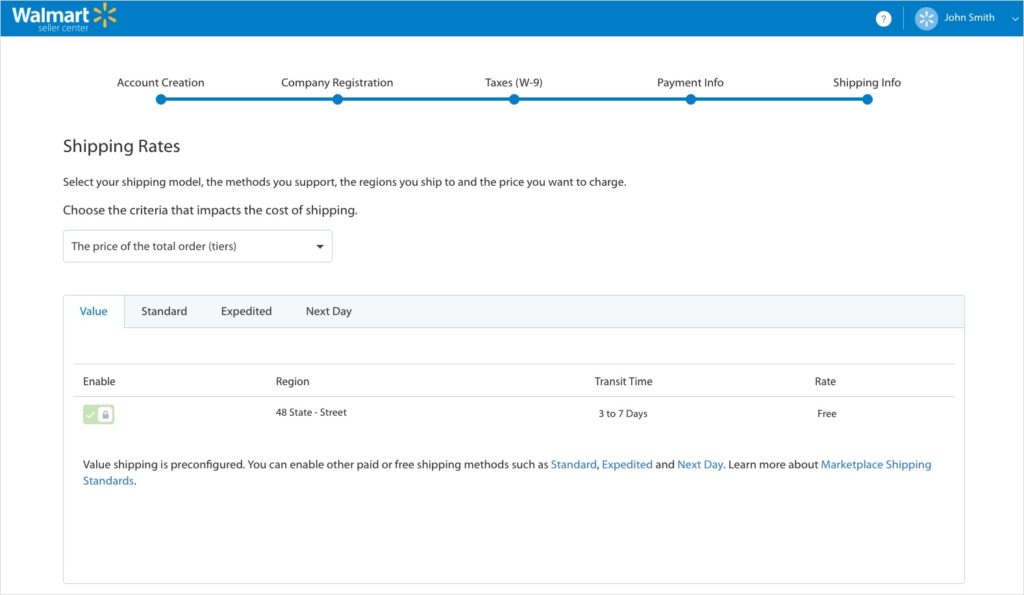
Walmart also lets you set transit time minimums and maximums for each method and region combinations. Take this into consideration with your current online sales and what works for you.
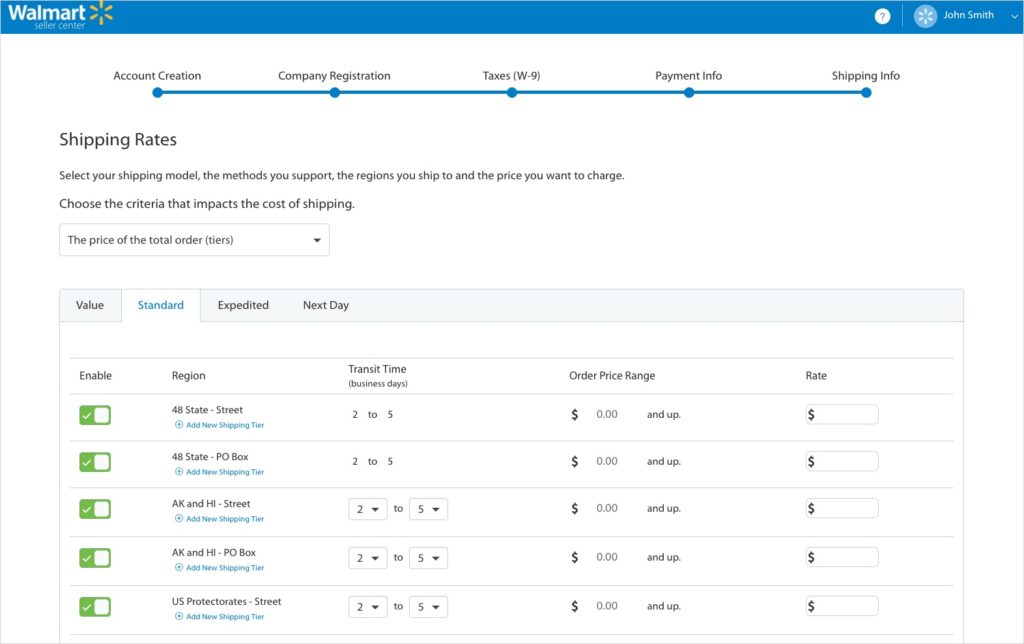
After filling out your shipping details, you can review your settings and click submit.
Step 3: Complete Your Partner Profile
Now that you’ve successfully registered, you can log into Walmart’s Seller Center and complete your Partner Profile. The Partner Profile tells Walmart shoppers all about your company and your policies.
To help you along with this process, we’ll discuss the sections you need to complete to get your profile up and running.
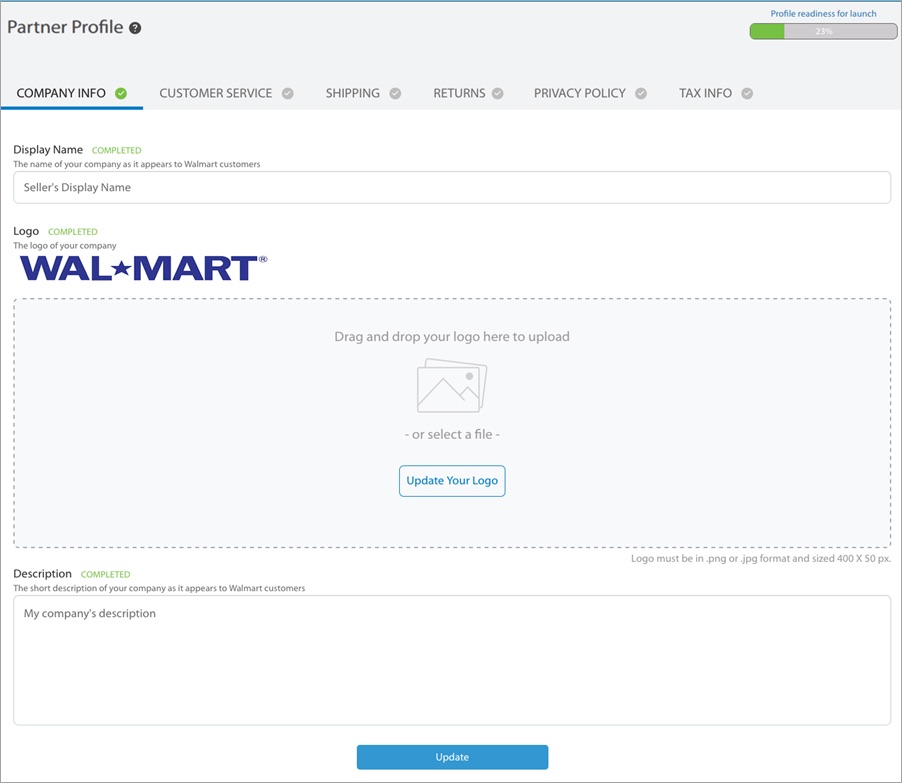
Add Your Company Info
In this section, you’ll enter your seller display name, upload your brand logo and add a brief company description.
Set Your Customer Service Policies
Next up are the details about your customer service policies. You’ll need to add your customer service contact details for your new customers. This includes things like your customer service phone number, email and best ways to contact you for support.
Additionally, you want to include the customer service policy information you’d like shoppers to know.
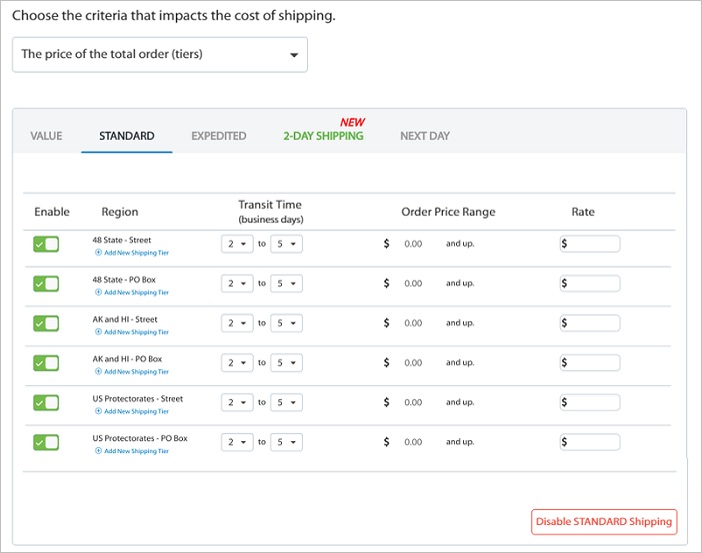
Pick Shipping Options
In this section, you’ll provide your shipping rates, processing schedule and shipping policies.
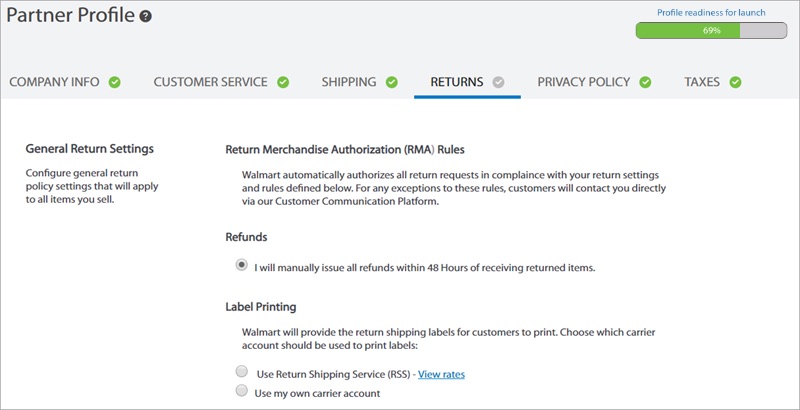
Decide Your Returns Policy
There’s also a section for returns, in which you specify your procedures, policies and fees associated with product returns. It’s smart to consider the amount of returns you typically see and how you plan to process items coming back to you both on Walmart and your own site.
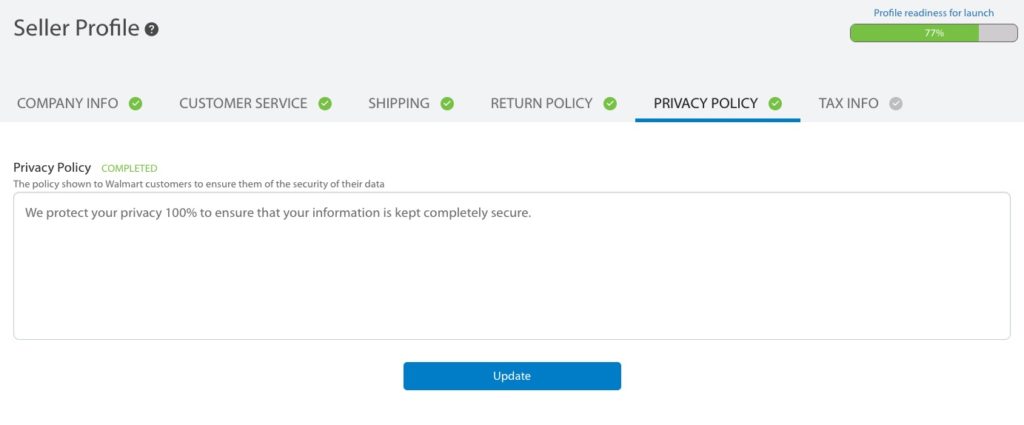
Add Your Privacy Policy
Next is the Privacy Policy section. This gives you the opportunity to share how you keep shopper data secure.
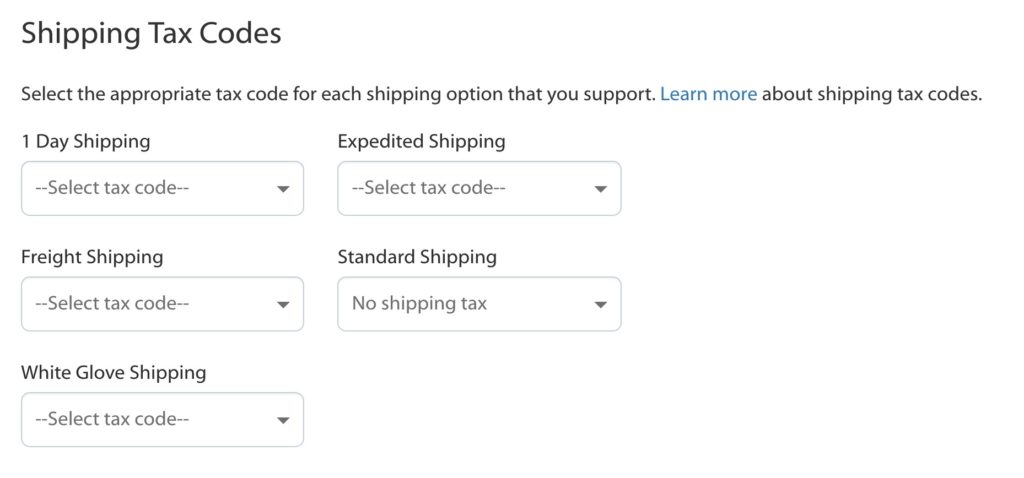
Input Your Specific Sales Tax Information
Shoppers may be charged sales tax when purchasing your products. To ensure that customers are aware of their sales tax, you need to provide your tax policies and offer details on the jurisdictions in which you may have a sales tax obligation.
You’ll also need to specify tax codes for each supported shipping method you choose.
Step 4: Add Your Products to the Walmart Marketplace
You’ve finished setting up your Seller Profile—great! Now it’s time to add your products you want to sell on Walmart Marketplace. You can set up your items through a number of integration methods. They include:
- API: This is the best method if your team has programming knowledge and you’re setting up a large catalog on Walmart.
- Bulk Upload: In this method, you create Excel spreadsheets containing your items to bulk upload to Walmart. This is a good option for sellers who have a limited catalog.
- Single Item: With this method, you’ll enter your product details directly into the Seller Center user interface. This method is recommended if you’re setting your first few items and/or if you have very limited product assortment.
- Solution Provider: There are a number of solution providers who can help you manage your listings on Walmart Marketplace. You can choose to work with one of Walmart’s approved solution providers to handle your listings for you.
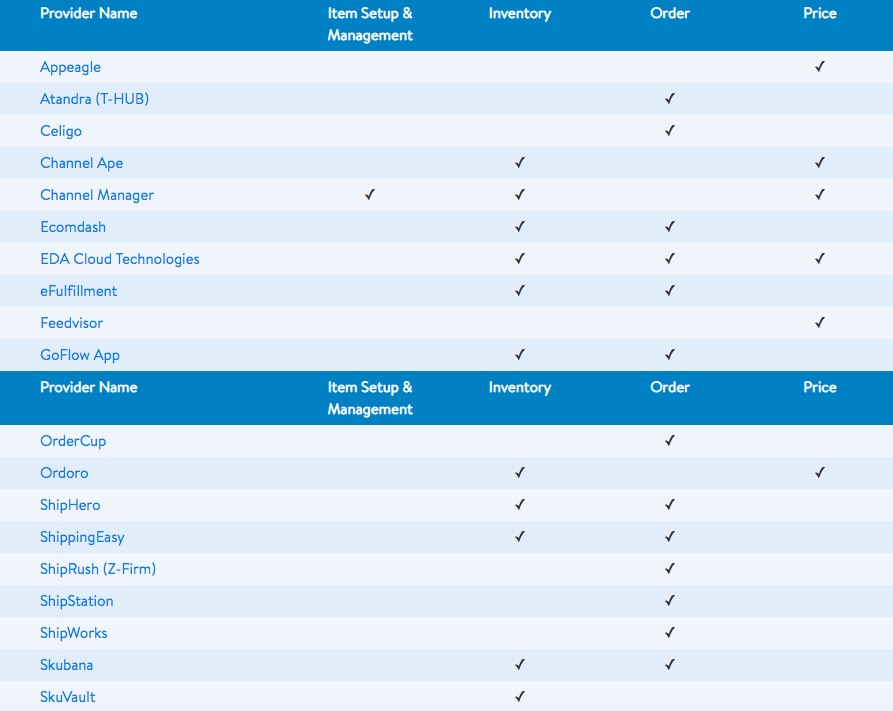
Make sure you do your homework before choosing a Walmart Marketplace solutions provider. There are some services that are tailored to specific products, which could be helpful for your brand.
Step 5: Preview Your Items & Place Test Orders
After the item setup stage, preview what your content and pricing will look like to shoppers. This is a critical step toward understanding what your shoppers will see.
If you’ve set up your items using Bulk Item Setup or REST APIs, you’ll need to check the Feed Status of your items. Here you will want to ensure your products were entered into the system correctly. Once you’ve confirmed, click on the Complete Item & Order Testing link in the Launch Checklist.
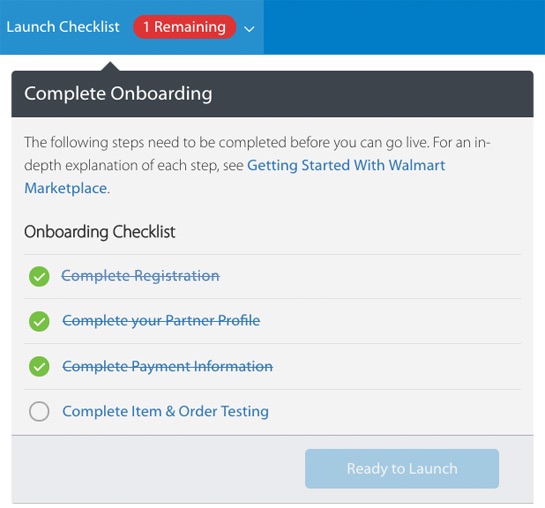
How to Preview Your Items
To preview how your items will look on Walmart’s website, click the Preview Item link on the item grid. This will bring up the listing page as it would appear to shoppers.
If this is your first time with Walmart Marketplace, make sure you review these product pages closely and ensure the details are correctly displayed.

How to Place Test Orders
To place a test order, update your price and inventory before publishing. Additionally, you will want to set the test item’s stock level to 1. This will prevent you from accidentally purchasing your product.
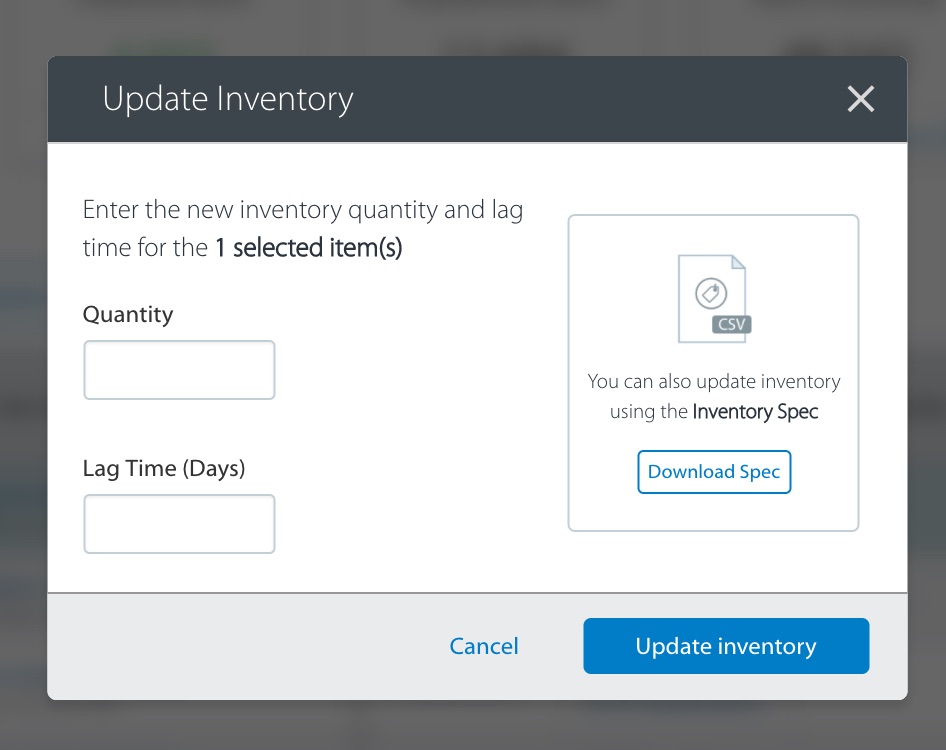
After publishing, click the Purchase Item link on the product grid. This will bring you to the live page where you can buy the item.

At this stage, you can test three different order scenarios:
- Order cancellation
- Order shipping
- Order adjustment
Once you’ve completed the tests for those scenarios, simply reset the prices and stock levels of your test items.

This concludes the setup stage of the Walmart Marketplace. After completing these steps, the Walmart team will review your details. If all goes well, your profile and products will appear on the site!
How to Optimize Your Walmart Marketplace Listings & Drive Sales
Congratulations on getting your account up and running on Walmart Marketplace! Now that you’re an official Seller, it’s time to optimize your listings and maximize your views and sales.
It might seem like the hard part is over, but to truly drive sales through the Walmart Marketplace, you have to optimize your listings. By following these four tips, you will have a much better chance at getting products to appear in front shoppers more frequently and effectively:
1. Focus on Your SEO Efforts
To improve your listings’ chances of showing up on search results—both on Walmart’s site and search engines like Google—you need to understand the components of your Walmart listing that are tagged for search.
SEO is a critical aspect toward product listenings and adding items on the Walmart Marketplace is no different. For starters, focus on these product aspects that are tagged for search:
- Product Name
- Images
- Key Features
- Description
- Attributes
To maximize your visibility, it’s important to optimize each of these components for SEO–here’s how:
Product Name
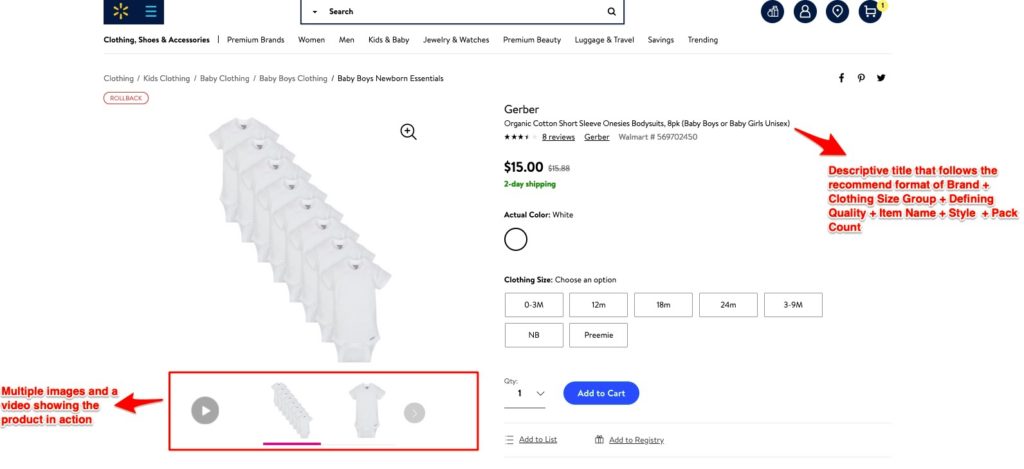
Your product name should succinctly describe the item you’re selling. Walmart recommends keeping your product names between 50 to 75 characters to promote readability and SEO results.
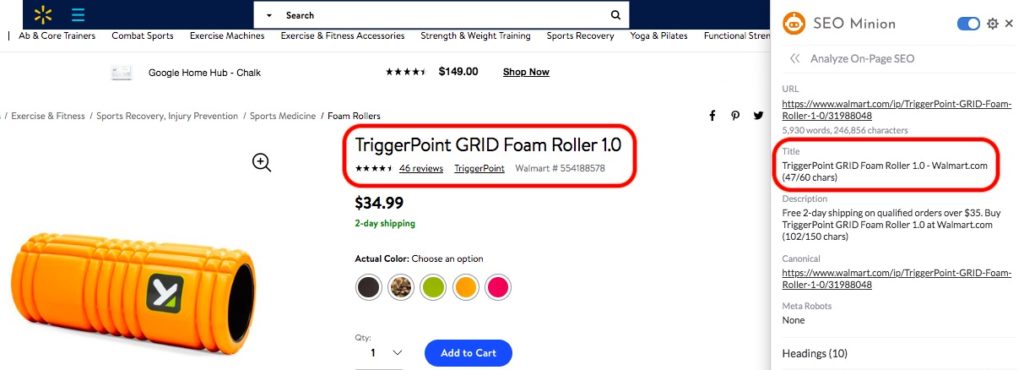
Walmart recommends following this format when entering your product name:
Brand + Clothing Size Group (if applicable) + Defining Quality + Item Name + Style (if applicable) + Pack Count
Images
Upload multiple images to showcase each item in multiple angles. If possible, use rich content formats such as videos which give shoppers a glimpse of the product in action.
Doing so lets customers see exactly what they’re getting. In turn, this gives customers confidence in their buying decision and the path to purchase.
Here’s an example from Gerber, whose product titles and images follow the above SEO best practices:
Descriptions
Use your product descriptions to tell shoppers about the features and benefits of your products. For best results, write product descriptions that are at least 150 words.
To further optimize the text for SEO, make sure that the product name, brand and relevant keywords are present in the description, but don’t overdo it! The key is to integrate keywords in a natural and readable way.
Otherwise, you’ll be keyword stuffing product descriptions, which search engines like Google, highly frown upon.
Key Features
In the About This Item section, add 3 to 10 product highlights or key features. This will give shoppers an overview of the product.
Call out specific product details and put the most important features first. And just like with the detailed description, you’ll want to naturally include some keywords in this section.
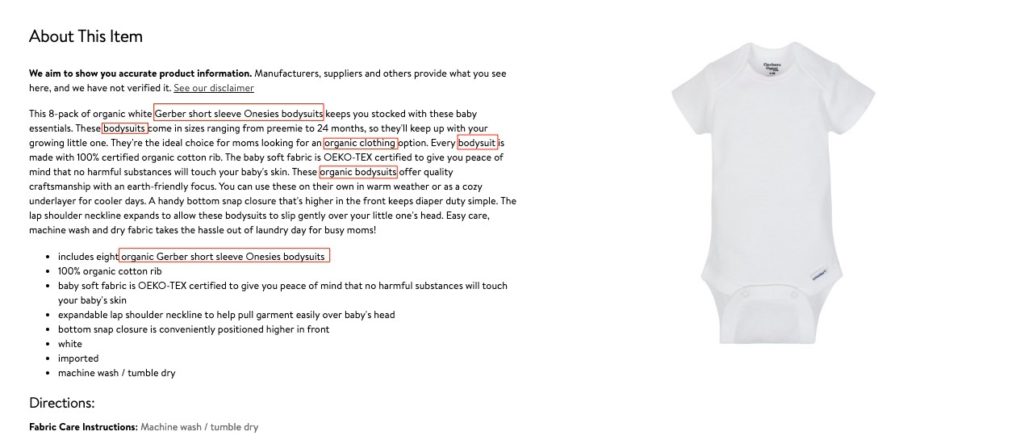
Here is a great example of a page with an SEO-optimized product description. It also lists its key features appropriately.
Attributes
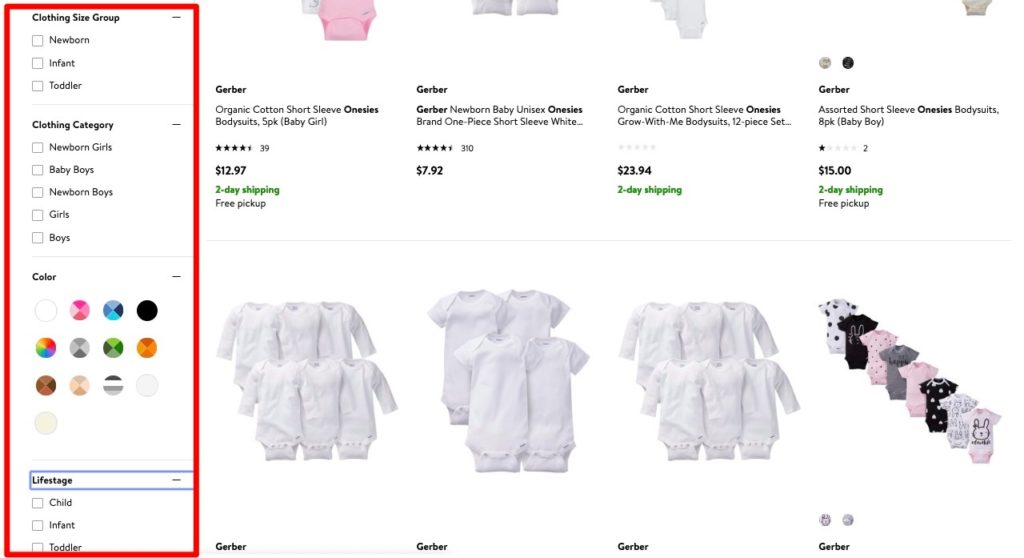
To ensure your items show up on the most relevant search results on Walmart.com, be sure to specify all the relevant attributes when setting up your products. To see which ones are relevant to your products, search for your items on Walmart.com, and check the left-hand panel for a list of attributes.
2. Win the Buy Box
In this next tip, it’s all about the buy box. If you’re products are also sold by others, Walmart will present those items one a single Item Page. This allows the customer to choose the seller when they buy.
While Walmart gives shoppers the option to view listings from other sellers, the item page will prominently display one seller’s listing in the Buy Box. And this is the section of the page that contains the Add to Cart button.
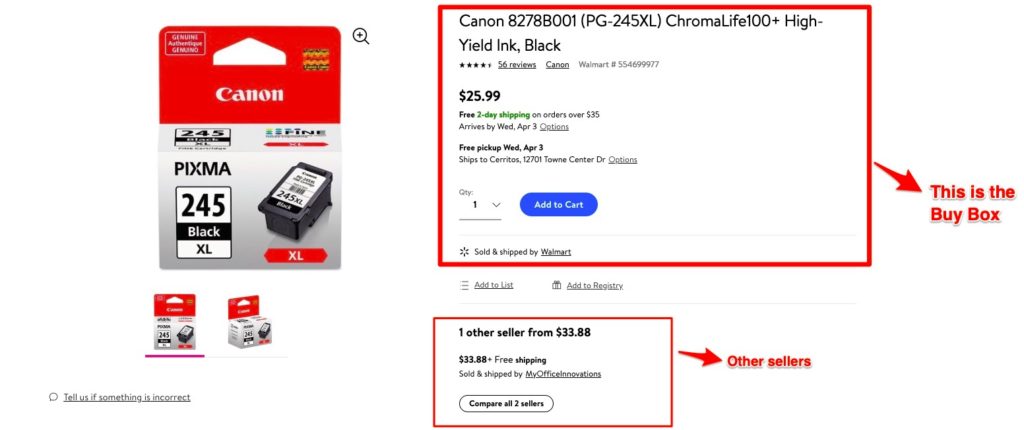
The seller that “wins” the Buy Box typically wins the sale because it’s featured more prominently on the page. For this reason, you should strive to own the Buy Box whenever possible.
Doing that involves two things:
- Keep your prices competitive (including shipping): Walmart usually displays the cheapest listing in the Buy Box, so sellers with the most competitive prices win.
- Have enough items in stock: Your item won’t appear on the Buy Box if you lack a healthy product stock. Monitor your inventory levels and keep them updated in the Seller Center.
To figure out if your products are winning the Buy Box, generate a Buy Box Report from the Seller Center. This report offers a bulk list of your items and shows which ones have won the Buy Box.
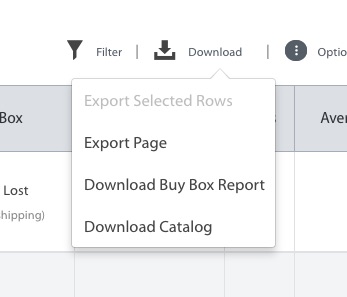
The report is updated every half an hour, so it can offer a near real-time view of your Buy Box status.

3. Generate a Lot of Ratings & Reviews
Having ratings and reviews dramatically increases your search results. Here at PowerReviews, we’ve found traffic to a product increases 108% after moving from no reviews to more than one review.
Additionally, when a product moves from zero to more than one review, the conversion rate increases by 65%. Needless to say, gaining customer feedback leads to a lift in traffic and sales.
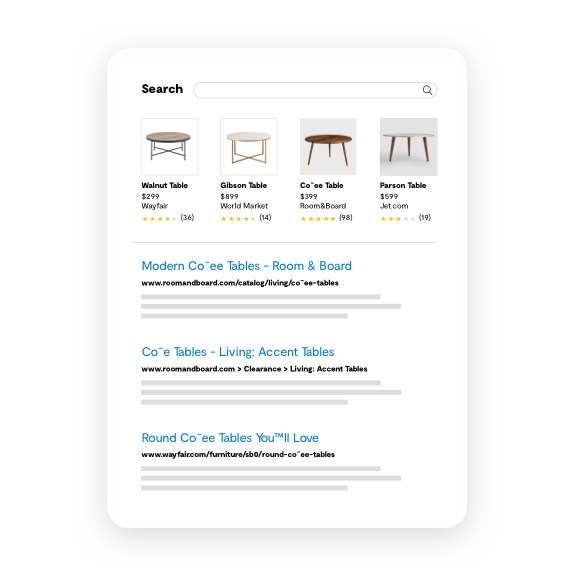
In fact, we focus on using a minimal Javascript size to showcase your product reviews even faster on retailer sites and your own. PowerReviews follows Google’s best practices and leverages tags and rich snippets.
Doing so allows your user-generated content in ratings and reviews to be indexed and rendered with Javascript. Ultimately, we increase page and loads speeds as HTML is no longer required.
To add even more good news, Walmart actively helps its sellers to get more product reviews. A few weeks after someone purchases a product, the retailer automatically sends the customer an email inviting them to rate and review their purchase.
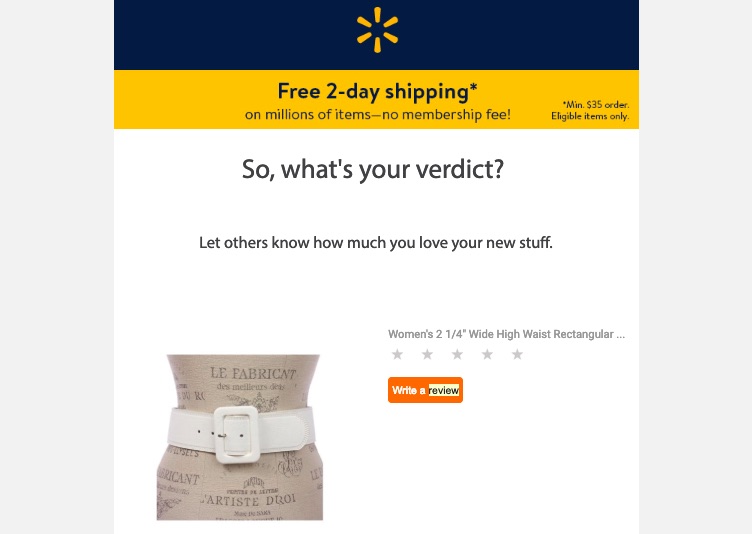
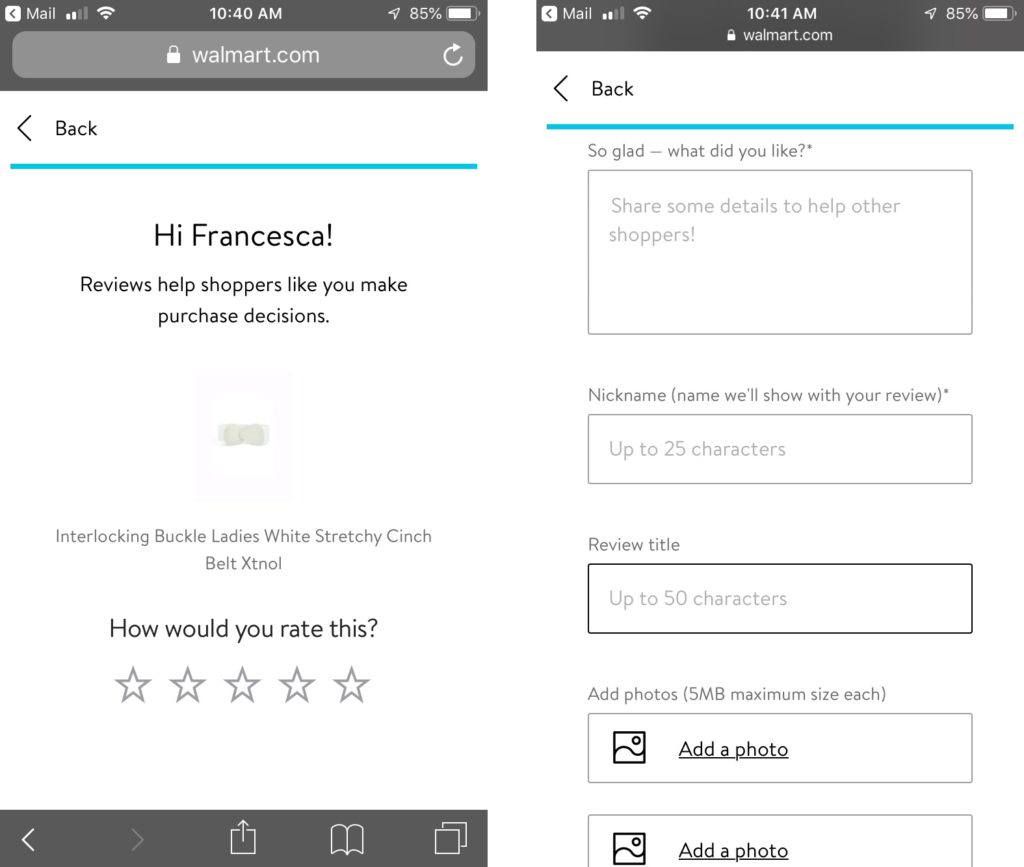
Customers who choose to review their purchase are taken to their account, where they rate the item purchased, add comments and upload photos.
That being said, take additional steps to gain even more ratings and reviews. Aside from relying on Walmart to collect feedback, you can implement review syndication through a platform like the PowerReviews Open Network.
Our completely open network syndicates your content to more than 150 of the world’s top retailers. Also, our AI-powered Product Knowledge graph and Content Operations Team matches and moderates your content to maximize your presence on retailer sites and shopping platforms.
To learn more, get in touch with our team today!
4. Run Promotions & Advertisements
SEO will boost traffic and sales, but to quickly drive visits, consider Walmart’s advertising options. To further increase your listing visibility and conversions, Walmart Marketplace offers you the ability to run promotions or paid ads on its site.
How to Implement Promotions
There are two types of promos on Walmart Marketplace:
- Clearance: The best option to sell slow-moving stock. Choose this promo type to reduce the original listing price.
- Reduced: For savings greater than 5% for items that cost $100 or for savings more than $5 for items that cost over $100, choose reduced.
To manage your promotions, complete the Price and Promo Spec on the Seller Center. The Price and Promo Spec is a downloadable Excel workbook that lets you enter all the details of your promotion (SKU, Price, Promo Status, Promo Price, Promo Type, etc.).

How to Run Ads
Walmart lets a limited number of merchants participate in the Walmart Performance Ads Program (WPA). The feature is a self-service ad platform, which you can create paid campaigns on the Marketplace.
If you’re interested in WPA, request access by submitting the following company details to wpasales@walmart.com:
- Business name
- Contact details (name, phone, email)
- Number of SKUs on the Marketplace
- Product categories
- Campaign goals
- Target customers
- Interest in annual plans and/or seasonal advertising
- Estimated ad budget
Your approval will be determined by the Walmart Media Group, who will factor in certain performance criteria on Walmart’s website. If you’re approved, you’ll be invited to attend a training webinar.
Once that’s done, you can start setting up your campaigns on advertising.walmart.com.
Winning on Walmart Marketplace
It takes a lot to get your listings set up. The effort is worth it. We understand the challenges for brands selling on Walmart Marketplace too. That’s why we hope this guide sets you off on the right foot.
Follow these tips to create more opportunities to drive traffic, reviews and sales. All that effort is worth it, especially when you tap into Walmart’s user base.
Remember–timing is key.
The Walmart Marketplace may not be as massive as Amazon–yet. However, the company wants to increase its share of online commerce. Get in early and reap the benefits right now.
Have any tips on the Walmart Marketplace? Reach out on Twitter and let us know what works for your brand!


